A Comprehensive Introduction to Traefik v2 with Docker
— 21 min read
If you're reading this chances are that you're already running a self-hosted setup using Traefik v1 and been procrastinating on migrating to v2. I've been on the same boat as you but, somehow, I made the move and decided to study Traefik's new architecture and migrate my services over to the newer version.
I can finally brag about my complete collection of 50+ useless self-hosted apps on r/selfhosted without getting downvoted for hosting them on old Traefik.
Jokes aside, this blog post is my attempt at making a comprehensive, step-by-step, straight-forward, no-bullshit introduction to Traefik v2 that I hope will be worth your time and will give you enough confidence to make the move and migrate your setup to the latest version.
Setting up the stage
To better understand the transition from Traefik v1 to v2, let's agree on a simple setup we'll be implementing in both old and new Traefik, and see how they compare to each other. Below are our simple requirements for exposing a simple echo service on the internet behind a reverse proxy:
- The echo service is running as a container based on
hashicorp/http-echoDocker image. - The echo service should be accessible via
echo.example.com. - The service is only accessible via HTTPS. If HTTP is used, the request should be redirected to HTTPS.
- Support for Let's encrypt certificates with automatic renewal
The old age of Traefik
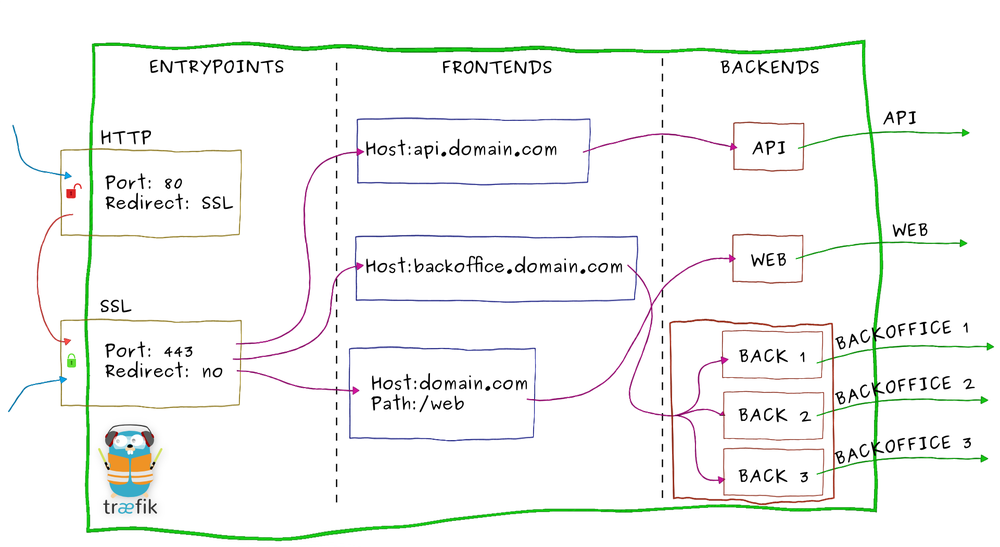
Here's how old Traefik worked: There were these 3 concepts called entrypoints, front-ends and back-ends. The first one tells Traefik what ports to listen on, the second one defines routing logic and the latter represents the running containers you wish to expose via Traefik. By attaching specially crafted labels to these containers, you tell Traefik how it should connect the dots between your entrypoints and back-ends. As an added bonus, Traefik can also automatically handles provisioning and management of Let's encrypt certificates with minimal effort.
In old Traefik, our agreed upon requirements can be implemented like this:
First, Traefik's configuration file:
#traefik.toml

defaultEntryPoints = ["https","http"]

[entryPoints]

  [entryPoints.http]
  address = ":80" # Listen on port 80
    [entryPoints.http.redirect] # Redirect everything coming in from http entrypoint...
    entryPoint = "https" #... to https entrypoint

  [entryPoints.https]
  address = ":443" # Listen on port 443
    [entryPoints.https.tls] # Enable tls in this port


[docker]
endpoint = "unix:///var/run/docker.sock" # Connect to Docker via this socket
domain = "example.com"
watch = true
network = "traefik-network" # Custom docker network
exposedByDefault = false

[acme]
email = "[email protected]"
storage = "acme.json"
entryPoint = "https"
  [acme.httpChallenge]
  entryPoint = "http" # Use http static file challenge for Let's encrypt
And second, our container declarations for Traefik and our echo service that:
#docker-compose.yml

version: '3'
services:
  traefik:
    container_name: traefik
    image: "traefik:v1.7"
    restart: always
    ports:
     - "80:80"
     - "443:443"
    volumes:
      - /var/run/docker.sock:/var/run/docker.sock
      - /path/to/traefik.toml:/traefik.toml:ro
      - /path/to/acme.json:/acme.json

  echo:
    image: "hashicorp/http-echo"
    labels:
     - "traefik.frontend.rule=Host:echo.example.com" # Route to this container if hostname matches "echo"
     - "traefik.port=80" # Route to this internal port
     - "traefik.enable=true" # Expose this container via Traefik.
That's it! Simple and bare-bones. I'm a simple man and I love simple things, this is what first sold me on Traefik. Good times!
In hindsight, there seems to be a lot of magic hidden behind this deceptively simple configuration. This simplicity has been a limiting factor to both customizing and evolving the reverse proxy. Traefik v2 tries to be more explicit and flexible about configuration, with clear, well-defined responsibilities at the expense of a tiny bit more verbose configuration, which at first, I admit, I didn't enjoy much.
Oh! And of course they had to introduce lots of breaking changes too.
Enter Traefik v2
My approach in introducing Traefik v2 is by explaining some new key concepts with examples of how they can be used. Each new concept will build on the previous one so that at the end, we'll have a fully functioning Traefik v2 setup that satisfies our requirements.
Static vs Dynamic configuration
Static configuration is what's typically found inside traefik.toml file, it's anything that stays unchanged at runtime. It's the perfect place for things like acme configuration and ports you wish to listen on. Traefik v2 allows using both yml and toml formats for configuration files. Throughout this guide I will be using examples written in yml format, because I'm sorry but toml is just not my thing.
Dynamic configuration is everything that can change during the lifetime of your reverse proxy. It is also the main feature of Traefik and what sold us all on it in the first place. Dynamic configuration allows Traefik to auto-magically update its configuration in response to new events happening inside the system. For example, spinning up new containers should trigger an update in Traefik's configuration to take into account the new service. Likewise, Traefik knows when your containers die and it stop routing traffic to them in response. Dynamic configuration is made available to Traefik via configuration providers.
Configuration providers
Configuration providers are the part that watches for changes in the system. There are many built in configuration providers and their job is to watch for changes and build a corresponding Traefik configuration model based on the new state of the system. For example, the Docker configuration provider is responsible for watching for container changes and building a matching Traefik configuration model each time a change is detected.
Configuration can come from many other sources like Kubernetes, Marathon, Rancher, or just a plain old yml file if that's your thing. In fact, if you look at Traefik's documentation, you'll notice that they provide, for each configuration example, 7 ways of how it can be done depending on your provider of choice, mine being Docker.
Here's how to instruct Traefik to use Docker as a configuration provider:
#Traefik.yml

providers: # You can add more than one provider if needed
  docker:
    endpoint: "unix:///var/run/docker.sock"
    network: "traefik-network" # Custom docker network
    exposedByDefault: false # Only expose explicitly enabled containers
The pipeline model
The old pipeline model was composed of entrypoints, front-ends and back-ends. Turns out that model wasn't descriptive enough and didn't define clear responsibilities about who should do what. For instance, whose responsibility is to manage Https redirection? Basic authentication? Load balancing? TLS management?
To better separate concerns, Traefik v2 introduced some new responsibilities to replace front-ends and back-ends: Routers, middlewares, services and certificate providers. Let's take a closer look at each one of them.

Entrypoints
This part didn't change compared to Traefik v1. Entrypoints Allow us to declare what ports we want Traefik to listen on. Https redirection is no longer declared at this level as it is not the responsibility of entrypoints to do redirections.
Entrypoints are a good example for static configuration since they don't generally change during runtime. Here's how to define two entrypoints named insecure and secure for HTTP and HTTPS respectively.
#Traefik.yml

entryPoints:
  insecure:
    address: ":80"
  secure:
    address: ":443"
Services
Services are an abstraction that represent any web app you wish to expose via Traefik. If you host web apps inside docker containers, services are the part that knows how to reach them, how many instances are there for a certain web app and how to load-balance them. By default, Traefik automatically creates a service for each enabled container, so you generally won't need to configure them manually.
In this example, we only need one Traefik label to enable our container. Traefik will automatically create a service for us behind the scene:
#docker-compose.yml

version: '3'
services:
  echo:
    image: "hashicorp/http-echo"
    labels:
      - "traefik.enable=true"
If the default auto-configuration generated by Traefik doesn't fit your needs, know that it is possible to declare your own services and configure how many instances of them you have and how to load-balance between them. I'll leave that as an exercise to the reader.
Traefik now knows about our container, but it's still not usable because we didn't tell it when and how it can be accessed. These concerns are the responsibility of routers.
Routers
This is the most important of all concepts. It's what connects everything together. If you need to make any kind of change to your Traefik's configuration, you'll likely need to update your routers.
Routers are responsible for connecting the two last points: entrypoints and services. In order to declare a router, you need to tell it at least 3 things: The entrypoint it should attach itself to, a service it should route requests to, and a predicate to tell it what requests it should route. Routers don't get auto-magically created, we need to explicitly declare them for each of our containers.
Let's examine this example of adding a router declaration to our echo service:
#docker-compose.yml

version: '3'
services:
  echo:
    image: "hashicorp/http-echo"
    labels:
      - "traefik.enable=true"
      - "traefik.http.routers.echo.rule=Host(`echo.example.com`)"
      - "traefik.http.routers.echo.entrypoints=secure"
      - "traefik.http.routers.echo.tls.certresolver=le"
There are two things to notice here:
- The expression
Host(`echo.example.com`)(Note the usage of backticks instead of single quotes) is a predicate that tells our router to only act on requests where the host matches likeecho.example.com. There other ways of expressing such predicates which are all documented here. - We didn't explicitly tell our router to what service it should route requests to. Remember, Traefik automatically created a service definition for our container. Our router will default to routing to this auto-created service which basically mean it will route matching requests to our echo container.
- Router are also responsible for managing TLS connections, so we had to tell our router what certificate provider to use for TLS support.
Certificate resolvers
Don't let this scare you. This is as easy as entrypoints. It's a static configuration section found inside our usual Traefik.yml file. Certificate resolvers are responsible for managing certificates for Traefik. Here's an example of how to configure acme as a certificate provider to auto manage let's encrypt certificates, with a basic HTTP file challenge.
#Traefik.yml

certificatesResolvers:
  le:
    acme:
      email: [email protected]
      storage: /acme.json
      httpChallenge:
        # used during the challenge
        entryPoint: insecure
insecure is just the name of our HTTP endpoint defined earlier. If you use a DNS challenge, Traefik's documentation has you covered
Middlewares
Like we've seen before, routers are responsible for routing requests from entrypoints to services. Middlewares give you an opportunity to intercept routed requests and act on them before they arrive to services. They can for instance modify, redirect, optimize, rate-limit, authorize or simply log your requests.
Traefik comes with many built-in middlewares which are ready to use. Let's take the use case of automatic HTTP to HTTPS redirection for all incoming requests. For this, we need:
- A router that will match all requests from the HTTP endpoint
- A middleware that will intercept all routed requests and redirect them to HTTPS
As previously stated, router declaration requires a target service. In our case, we don't need one since all incoming requests will be intercepted by the middleware which will immediately reply with an HTTP redirect before they even get to their intended service. Traefik will automatically attach a service to our router, or you can attach any service you want because it doesn't matter what you put anyway!
Here's how all this translates in terms of Docker labels:
#docker-compose.yml

# Http to Https redirect
"traefik.http.routers.http_catchall.rule=HostRegexp(`{any:.+}`)"
"traefik.http.routers.http_catchall.entrypoints=insecure"
"traefik.http.routers.http_catchall.middlewares=https_redirect"
"traefik.http.middlewares.https_redirect.redirectscheme.scheme=https"
"traefik.http.middlewares.https_redirect.redirectscheme.permanent=true"
We named our router http_catchall. It matches all requests incoming from HTTP endpoint and routes them through a middleware named https_redirect which is an instance of the built-in RedirectScheme middleware. Each middleware has its own configuration parameters which Traefik docs does a good job of documenting. For instance, our RedirectScheme middleware supports 3 parameters (permanent, scheme and port) as documented here.
Notice how I only put docker labels in the previous example without showing the container they belong to. I did this on purpose to illustrate that it actually doesn't matter on what container you put these configurations labels in. HTTPS redirection is a global behavior and is not specific to any one of your containers. Such global configuration can be put in a simple yml file, but my personal preference is to attach them as labels to Traefik container itself, like this:
#docker-compose.yml

version: '3'
services:
  traefik:
    image: "traefik:v2"
    ports:
      - "80:80"
      - "443:443"
    volumes:
      - /var/run/docker.sock:/var/run/docker.sock
      - /path/to/traefik.yml:/etc/traefik/traefik.yaml:ro
      - /path/to/acme.json:/acme.json
    labels:
      #Super important!
      - "traefik.enable=true"

      # HTTP to HTTPS redirection
      - "traefik.http.routers.http_catchall.rule=HostRegexp(`{any:.+}`)"
      - "traefik.http.routers.http_catchall.entrypoints=insecure"
      - "traefik.http.routers.http_catchall.middlewares=https_redirect"
      - "traefik.http.middlewares.https_redirect.redirectscheme.scheme=secure"
      - "traefik.http.middlewares.https_redirect.redirectscheme.permanent=true"

networks:
  default:
    external:
      name: "traefik-network"
It is important to enable Traefik's container itself using traefik.enable: true or else all global configuration we defined at this container's level will be ignored.
Recap
Whoaah! We've covered a lot of things. Here's what we learned so far:
- Static configuration is for things that don't change during runtime, like acme and ports configurations
- Dynamic configuration is for things that we want to dynamically change during runtime.
- Configuration providers are the part that watches for changes in the system, and notifies Traefik of the new configuration to be applied that reflects the new state of the system. Traefik has many built-in configuration providers among which we find Docker provider.
- Entrypoints represent the ports where Traefik will listen to incoming requests
- Services represent containers we wish to expose. They know how to reach them and can also load-balance between them.
- For each container you want to expose, we need to at least declare a router with optional middlewares.
- Middlewares allows us to act on incoming requests before they arrive to their intended services
- For each enabled container, Traefik automatically declares a corresponding service and attaches it to declared routers at the container level
Now let's assemble everything we've seen so far to make a working Traefik v2 setup that satisfies our requirements:
First, our static Traefik's configuration file, in yml format of course:
#Traefik.yml

#Define HTTP and HTTPS entrypoints
entryPoints:
  insecure:
    address: ":80"
  secure:
    address: ":443"

#Dynamic configuration will come from docker labels
providers:
  docker:
    endpoint: "unix:///var/run/docker.sock"
    network: "traefik-network"
    exposedByDefault: false

#Enable acme with http file challenge
certificatesResolvers:
  le:
    acme:
      email: [email protected]
      storage: /acme.json
      httpChallenge:
        # used during the challenge
        entryPoint: insecure
And two container definitions for Traefik and our echo service:
#docker-compose.yml

version: '3'
services:
  traefik:
    image: "traefik:v2"
    ports:
      - "80:80"
      - "443:443"
    volumes:
      - /var/run/docker.sock:/var/run/docker.sock
      - /path/to/traefik.yml:/etc/traefik/traefik.yaml:ro
    labels:
      - "traefik.enable=true"

      # HTTP to HTTPS redirection
      - "traefik.http.routers.http_catchall.rule=HostRegexp(`{any:.+}`)"
      - "traefik.http.routers.http_catchall.entrypoints=insecure"
      - "traefik.http.routers.http_catchall.middlewares=https_redirect"
      - "traefik.http.middlewares.https_redirect.redirectscheme.scheme=https"
      - "traefik.http.middlewares.https_redirect.redirectscheme.permanent=true"

  echo:
    image: "hashicorp/http-echo"
    labels:
      - "traefik.enable=true"
      - "traefik.http.routers.echo.rule=Host(`echo.example.com`)"
      - "traefik.http.routers.echo.entrypoints=secure"
      - "traefik.http.routers.echo.tls.certresolver=le"

networks:
  default:
    external:
      name: "traefik-network" #The same network defined in Docker provider config
And here, my friends, is the minimal configuration needed to expose a simple service via Traefik with Let's encrypt support and HTTPS redirection. It's a bit more verbose than v1 version but I hope you can see that it's also more powerful and more expressive about our intents. For most people this minimal setup should be enough to cover basic needs. For those who want a little more, please carry on reading.
Beyond the minimal configuration
So we've got our echo service working with Traefik v2. Let's test our understanding of the newly introduced concepts by throwing in some additional requirements for our setup. We now would like to:
- Expose Traefik's internal monitoring dashboard. Should be accessible in HTTPS via
traefik.example.com - Add basic authentication for accessing the echo service.
Whenever you need to change something in Traefik v2, I'd like you to focus on how the new change translates in terms of routers, middlewares and services. Let's apply this for our new requirements.
Traefik's dashboard
For this requirement, we need to define a new router that listens on HTTPS entrypoint and matches all requests starting with traefik.example.com. We don't need any middlewares for this use case, but we still need a target service. It turns out Traefik has a ready to use internal service that knows how to reach the dashboard web-app. This internal service is called api@internal. It is disabled by default so we'll need to enable it. Finally, to enable TLS support, we need to point our router to the already defined certificate resolver we named le.
First, let's enable Traefik's dashboard in static configuration:
#Traefik.yml

#Add this somewhere in file
api:
  dashboard: true
Then let's configure a new router for the dashboard:
#docker-compose.yml

# Docker labels for enabling Traefik dashboard
- "traefik.http.routers.traefik.rule=Host(`traefik.example.com`)"
- "traefik.http.routers.traefik.entrypoints=secure"
- "traefik.http.routers.traefik.service=api@internal"
- "traefik.http.routers.traefik.tls.certresolver=le"
Again, where should we put these labels? Since we've explicitly set our service and manually defined all router parameters, we can put this anywhere we want. Following what we did previously, we can put it in Traefik's container definition itself.
I strongly advise you to enable Traefik's dashboard while learning as it gives you a good overview of all your routers, services and middlewares. Here's an example from my personal server:

Adding authentication
To implement basic authentication for our echo service, we need to intercept all requests to access it, check the credentials and then allow or refuse access to it. Intercepting requests is the responsibility of Middlewares, and again Traefik's got us covered: The BasicAuth built-in middlewares is exactly what we need.
Let's modify our echo server definition to include these changes:
#docker-compose.yml

echo:
    image: "hashicorp/http-echo"
    labels:
      - "traefik.enable=true"
      - "traefik.http.routers.echo.rule=Host(`echo.example.com`)"
      - "traefik.http.routers.echo.entrypoints=secure"
      - "traefik.http.routers.echo.tls.certresolver=le"

      #Declare a new middleware named echo-basic-auth of type basicauth
      #Password generated using htpasswd utility
      - "traefik.http.middlewares.echo-basic-auth.basicauth.users=Bob:$apr1$gek8o0d6$0twMFcl5.RoJG6DhlYSk40"
      #Link declared middleware to router
      - "traefik.http.routers.echo.middlewares=echo-basic-auth"
It is of course possible to authorize multiple users which will be declared in a separate file. I'll leave that as an exercise for you (Hint: just read the docs).
The end
Not only did Traefik manage to break backwards compatibility, but it also requires more lines to configure than before. With this extra effort comes new configuration possibilities and an improved architecture with clearly separated concerns. I say the price to pay is fair this time and I'm glad I made the move. I hope you'll make the move too!
The examples I gave should be enough to cover most of your needs. Should you require more customizability, I invite you to check out Traefik's documentation and to have a look at their excellent blog post Traefik 2.0 & Docker 101 which can also serve as a good introduction to Traefik's v2.
Happy Self-hosting!